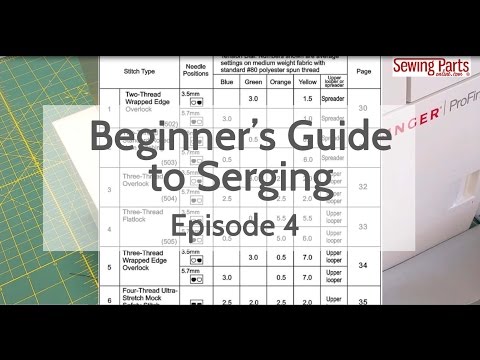
Hey everyone, welcome back to our beginner's guide to serging. In Episode four, we're going to learn how to make an overlock stitch and how to remove our serger threads. There are three types of overlock stitches: two thread, three thread, and four thread. Today, we'll go over how to do a three thread and four thread overlock and we'll talk about tension. The three thread overlock only uses one needle. Which needle you use depends on how wide you want your stitch to be. The first thing you want to do is create a thread chain. So, grab the thread ends and press your foot pedal. You'll see your thread chain start to form, and you want somewhere between three to four inches. Now, the tension settings you'll use depend on your machine. The best place to start is your manual. If you don't have your manual, go to our site and get yourself a new one because you will definitely need to refer to it. The tension settings that your manual suggests are just that, just a suggestion, a starting point. Because just like sewing on a sewing machine, many things affect your tension. The stitch width will affect your loopers, the stitch length will affect your needle, and the fabric thickness and weight. We'll get to all that a little bit later. First, let me just show you how to feed your fabric. So, I've got my presser foot down, my thread chain off to the back, my serger knife is engaged. I've set up my machine using my recommended settings. So, all you do is put your fabric up to the front of your presser foot and let the feed dogs pull it through. Your presser foot is already down, so don't worry about lifting anything up and...
Award-winning PDF software


Video instructions and help with filling out and completing What Form 8655 PDF